Congratulations on your commitment to fitness & purchase of Total Gym® STATS the Smart Track Active Training Sensor that will lead to your success. To get started, choose your gym & watch the video instructions below.
Select Your Equipment:
ALL TOTAL GYMS (not including Total Gym® Evolve or GTS)
or
TOTAL GYM EVOLVE
Watch Setup Video for all Total Gyms (except EVOLVE or GTS)
Or Follow the Step-by-Step Instructions Below:
Get the mobile app
Download the Total Gym® Home Fitness app from the app store on your mobile device. Be sure to allow access to Bluetooth when installing the app. If you’ve already downloaded the app, proceed to the installation steps below.
Open app & allow access to all prompts (i.e. device location, physical activity, calendar, & find-connect-determine relative position of nearby devices; this will ensure a quick connect once all steps are complete).
Remove all items from the box.
Check that all components are included. Contact customer service if you have any missing parts.
Move your glideboard to the top of the rails & with both hands on the sides of the middle of the glideboard, carefully lift it off the rails & lay the cushioned side of the glideboard on a flat surface.
With the supplied screwdriver, unscrew the four screws attaching the bottom fender to the glideboard.
Remove the bottom fender (bottom fender only), it will no longer be needed after sensor is installed. If your gym doesn’t come with a bottom fender, please skip to the next step.
Center the tape between the squat stand receptacles, aligning the top of the tape with the center of the receptacle holes (as shown in video).
Once comfortable with the placement area, carefully peel off the backing from the tape & apply. USE CARE WHEN APPLYING: TAPE HAS A STRONG BOND ADHESIVE & WILL NOT BE RE-POSITIONABLE AFTER CONTACT.
Center the bracket on the bottom of the glideboard, with the lip facing toward the cushion part of the glideboard. *The Total Gym logo will appear upside down but that’s okay for now.*
Next, locate your sensor housing & remove the battery cover. Then locate the two large screws.
Place the sensor housing onto the bracket connector with the sensor “eye” facing the lip side of the bracket.
Double-check that the sensor bracket & housing are still centered on the glideboard.
Insert one of the large screws through one of the battery compartment & bracket holes, & with downward pressure on the screwdriver, insert your first screw about halfway into the glideboard. Do not tighten screw all the way.
Again, with downward pressure, insert the second screw about halfway.
Alternate tightening screws until the sensor housing & bracket are flush with the bottom of the glideboard & secured in place.
Do not use a power drill or over-tighten screws, it may crack the housing or bracket.
Insert your two AA batteries. The LED indicator will flash white, & then flash green, if successful.
With both hands, pick up your glideboard & place it back on the top portion of the rails, ensuring it’s properly aligned & rolls freely, before guiding it back down to the bottom of the rails.
Please check to confirm your sensor device is properly aligned to the sensor tape.
Lastly, follow the steps on the next page to CONNECT & CALIBRATE the sensor in the app.
CONNECT and Calibrate
Your phone must allow the Total Gym® Home Fitness app access to Bluetooth in order to calibrate the sensor. Enable this from your phone’s Settings screen.
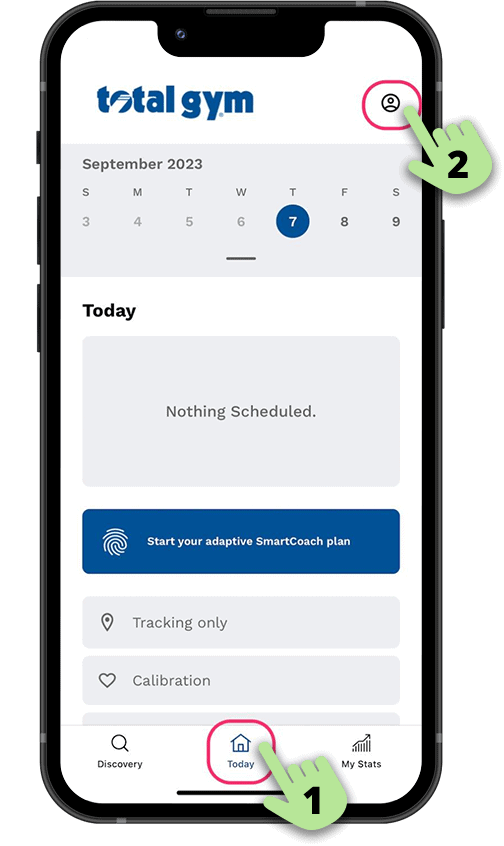
First, go to the settings screen
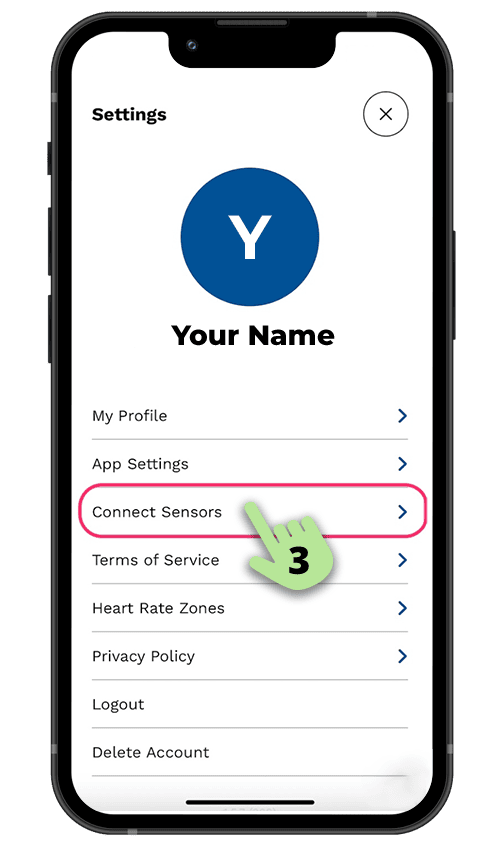
Next, choose Connect Sensors
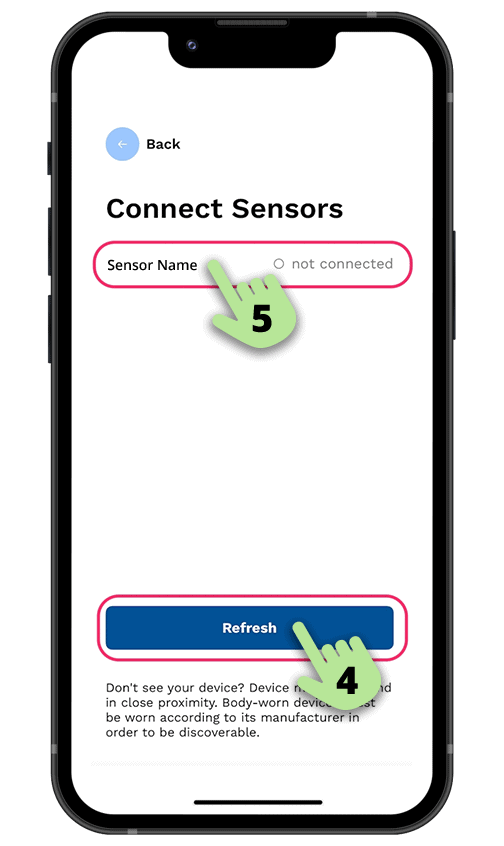
Next, find your Total Gym Stats sensor, the name will begin with TG-STATS
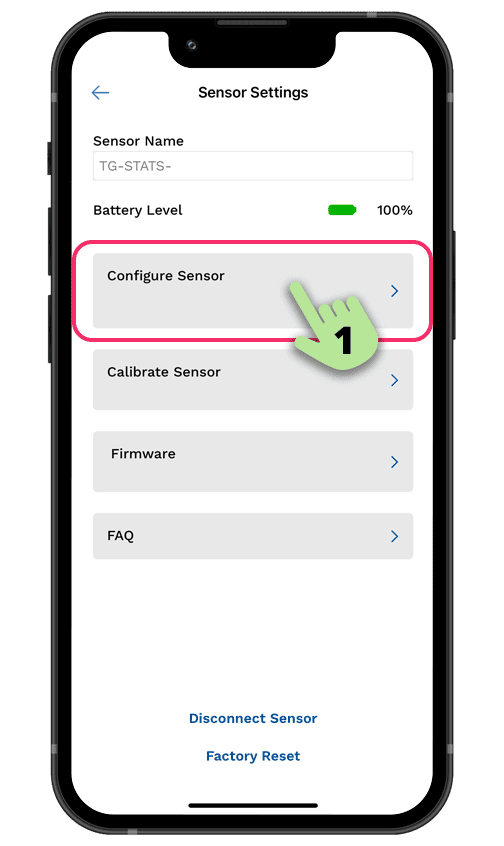
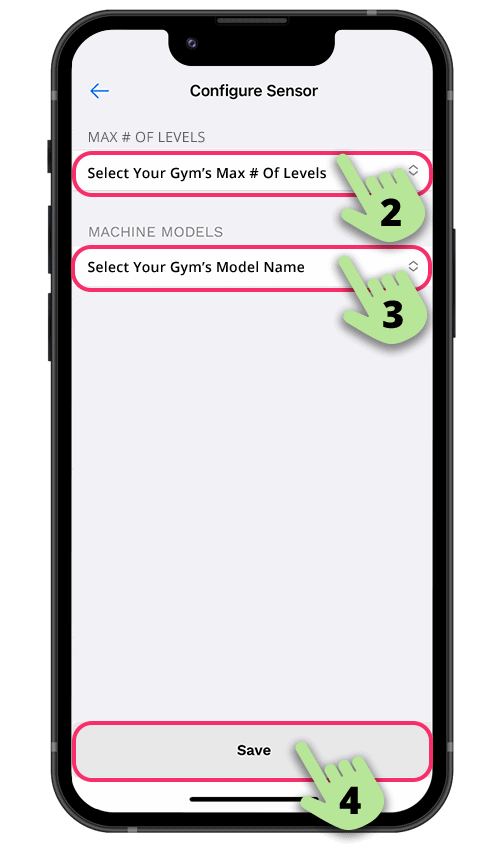
On the next screen, choose Configure Sensor
Then, select the number of levels and model name of your Total Gym.
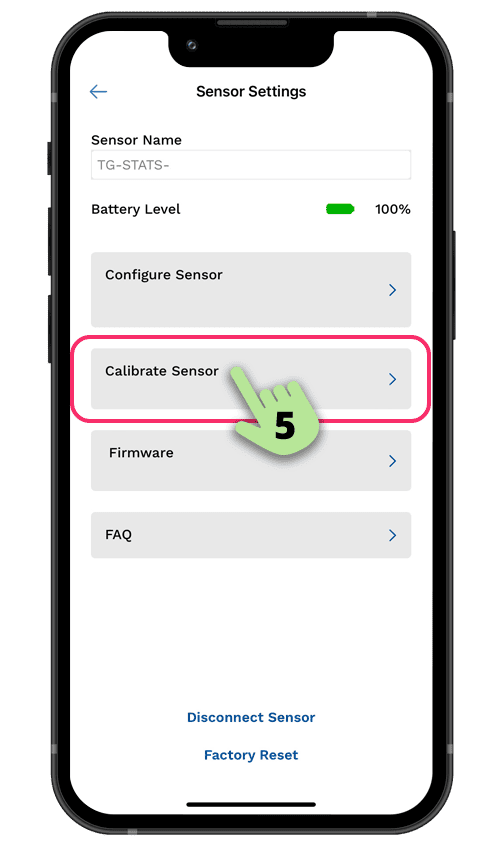
Lastly, select Calibrate Sensor and follow the steps until completed.
Congratulations! You are now ready to track workouts & meet your fitness goals, with Total Gym® STATS & Home Fitness app!
Download the Total Gym® Home Fitness app from the app store on your mobile device. Be sure to allow access to Bluetooth when installing the app. If you’ve already downloaded the app, proceed to the installation steps below.
Open app & allow access to all prompts (i.e. device location, physical activity, calendar, & find-connect-determine relative position of nearby devices; this will ensure a quick connect once all steps are complete).
Remove all items from the box.
Check that all components are included. Contact customer service if you have any missing parts. NOTE:SENSOR BRACKET PART PROVIDED WILL NOT BE USED DURING THE INSTALL.
Center the tape on the inside of the bottom crossbar.
Once comfortable with the placement area, carefully peel off the backing from the tape & apply. USE CARE WHEN APPLYING: TAPE HAS A STRONG BOND ADHESIVE & WILL NOT BE RE-POSITIONABLE AFTER CONTACT.
Next, take the supplied screwdriver & insert the small screws through the sensor housing holes & pre-drilled metal bracket holes. Tighten screws (alternating evenly) until sensor is secured in place.
Do not use a power drill or over-tighten screws, it may crack the sensor device.
Insert your two AA batteries. The LED indicator will flash white, & then flash green, if successful.
Lastly, follow the steps on the next page to CONNECT & CALIBRATE the sensor in the app.
CONNECT and Calibrate
Your phone must allow the Total Gym® Home Fitness app access to Bluetooth in order to calibrate the sensor. Enable this from your phone’s Settings screen.
First, go to the settings screen
Next, choose Connect Sensors
Next, find your Total Gym Stats sensor, the name will begin with TG-STATS
On the next screen, choose Configure Sensor
Then, select the number of levels and model name of your Total Gym.
Lastly, select Calibrate Sensor and follow the steps until completed.
Congratulations! You are now ready to track workouts & meet your fitness goals, with Total Gym® STATS & Home Fitness app!